In today’s digital age, music streaming services have become an integral part of our daily lives. Among them, platforms like Spotify lead the pack with their vast libraries and intuitive user experiences. Designing such a service involves a complex interplay of algorithms, databases, and networking. This article delves into the core components required to build a scalable and reliable music streaming service.
Core Features of a Music Streaming Service
Before diving into the system design, let’s outline the fundamental features our service will offer:
- Music Playback: Allows users to stream music tracks.
- Search Functionality: Enables users to find songs, albums, artists, and playlists.
- User Account Management: Supports user registration, authentication, and profile management.
- Playlist Creation and Management: Users can create, share, and edit playlists.
- Recommendation Engine: Suggests music based on listening habits.
Initial Phase: Base Version
Requirements:
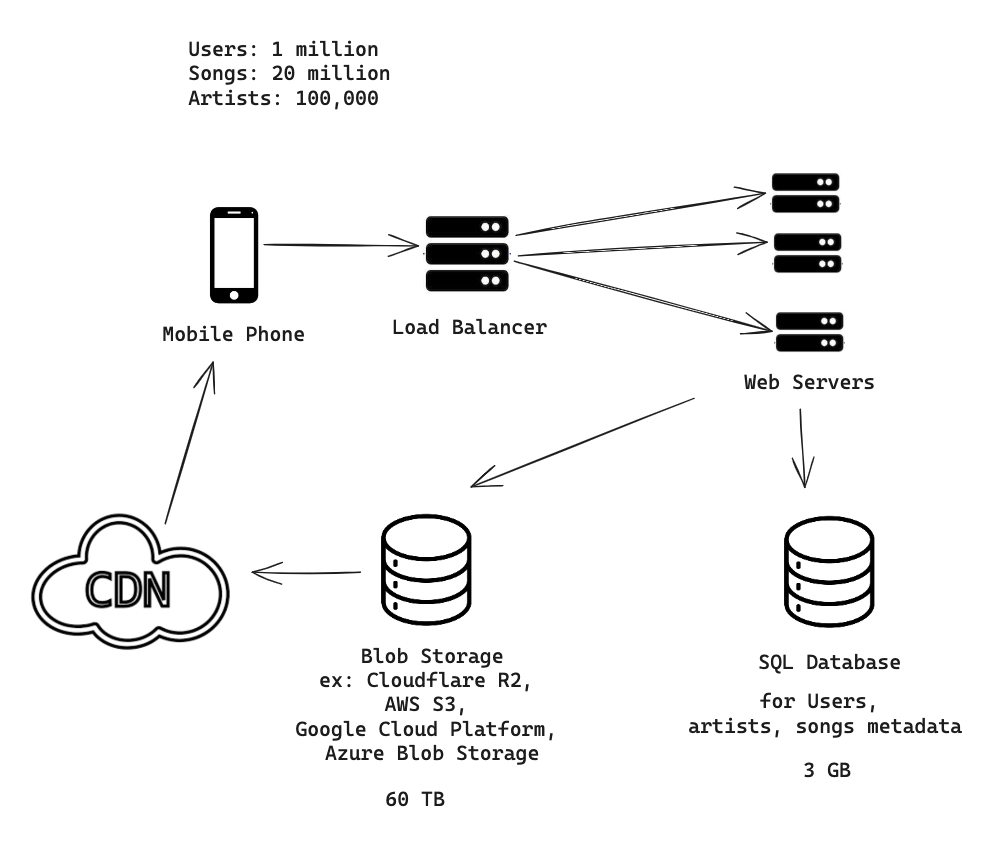
- Users: 1 million, who plays the songs
- Songs: 20 million
- Artists: 100,000, who uploads the songs
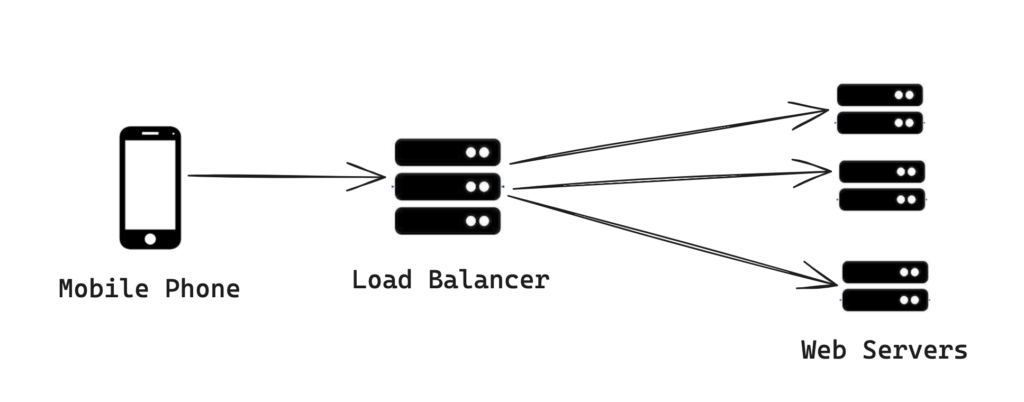
System Architecture Overview
Designing a service capable of handling millions of concurrent users requires a robust architecture. Below is a simplified overview:
- App: Web or mobile app through which users will interact with the music streaming service
- Web Servers: Handle API requests such as user authentication, metadata retrieval, and search queries.
- Load Balancers: Distribute incoming requests evenly across a network of servers to prevent any single point of overload.
- Application Servers: Process business logic, including playlist management and music recommendation algorithms.
- Database Storage: Store structured data such as: user data, music metadata, playlists etc is stored using SQL since SQL allows for complex and faster queries and manage relationships.
- Blob Storage: The song files will be stored in a Blob (Binary Large Object) storage service ex: Cloudflare R2, AWS S3, Google Cloud Platform, Azure Blob Storage etc which are meant for storing large unstructured data. This allows for efficient storage and retrieval.
- CDN (Content Delivery Network): Distributes music files globally to minimize latency during music playback using a CDN service ex: Cloudfront / Cloudflare.
- Cache Layer: Improves data retrieval performance by temporarily storing frequently accessed data. We can use the LRU (Least Recently Used) caching strategy to cache the popular songs while the unpopular songs will be cached on demand. Usually this is implemented by CDN service providers
Storage Estimation
Song Storage
- Assumption: Average song size is 3MB.
- Calculation: With 20 million songs, the total storage needed is 3MB×20,000,000=60,000GB or 60TB
Song Metadata Storage
- Assumption: Average metadata size per song is about 100 bytes.
- Calculation: For 20 million songs, 100 bytes×20,000,000=2GB
User Metadata Storage
- Assumption: On average, 1KB of data per user.
- Calculation: For 1 million users, 1KB×1,000,000=1GB
Key Components Explained
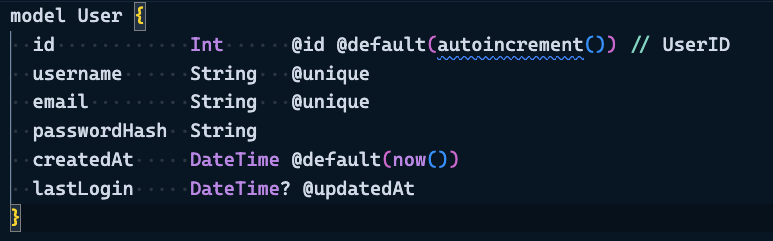
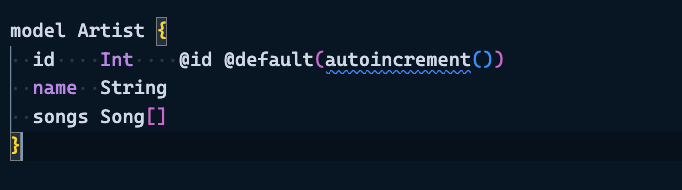
1. Data Model – SQL Database Structure
User table:
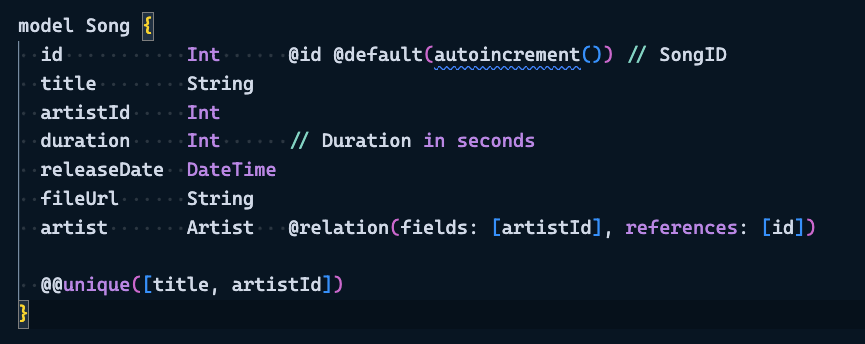
Song table:
Artist table
Relationships:
We have joined the Artist and Song Tables, where we will have the artistID (Foreign key pointing to the Artist Table) and SongID (Foreign key pointing to the Song Table). From there, we can get the song metadata, which will also contain the fileURL property, pointing to the Blob storage where the song is located.
2. Efficient Search Mechanism
Implementing a fast and accurate search feature requires indexing and a robust search algorithm. Elasticsearch is a popular choice for this purpose, given its scalability and speed.
3. Personalized Music Recommendation
Machine learning algorithms analyze user listening habits to provide personalized music recommendations. This involves processing large datasets to identify patterns and preferences.
Putting it all together – Initial Phase
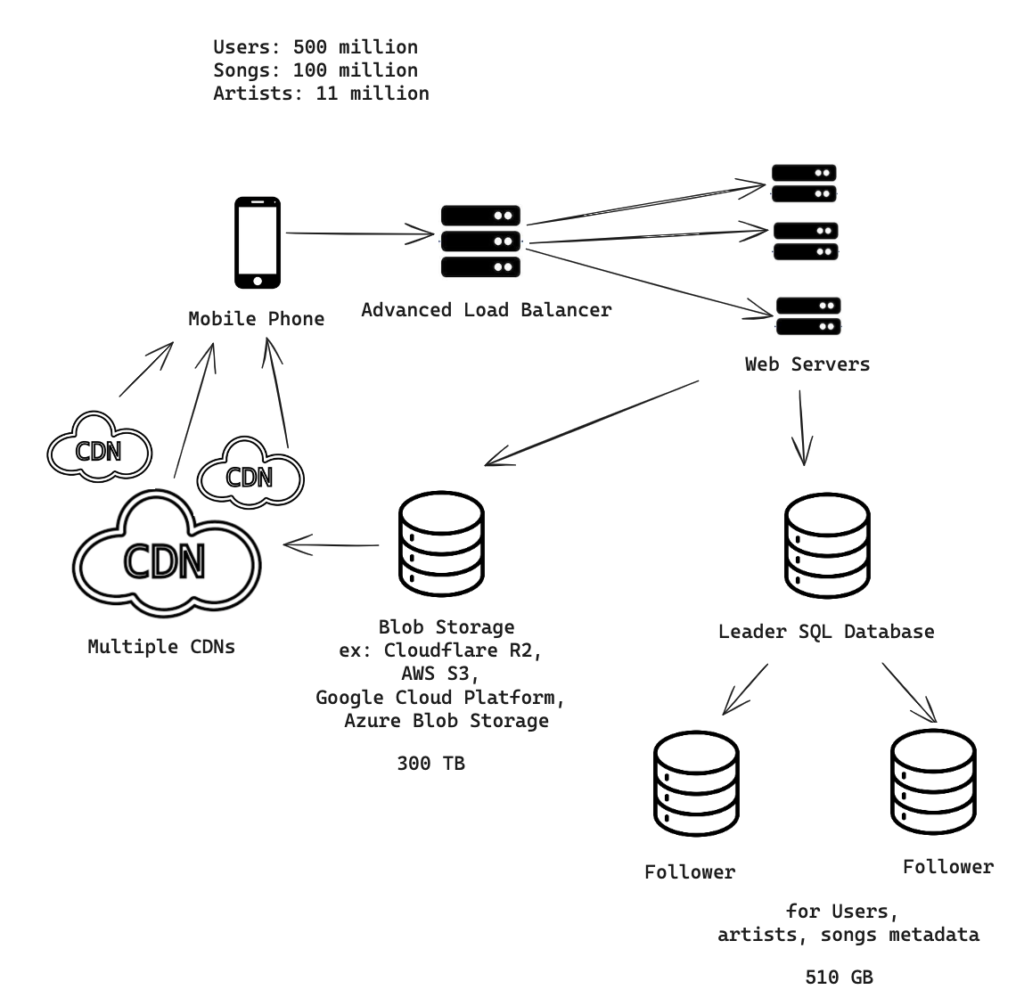
Scaled Phase: Expansion to 500 Million Users
Requirements
- Users: 500 million
- Songs: 100 million
- Artists: 11 million
Scaling to half a billion users and expanding the music library tenfold presents significant challenges. The architecture must not only support increased load but also maintain, if not improve, the quality of service.
Scaling Strategies
- Microservices Architecture: Breaking down the application into microservices allows for easier scaling and maintenance.
- Advanced Load Balancing: Implementing more sophisticated load balancing techniques to distribute traffic efficiently across servers worldwide.
- Global Server Load Balancing (GSLB): Distributes traffic across multiple data centers based on location, improving speed and reliability.
- Layer 7 Load Balancing: Makes routing decisions based on the content of HTTP/HTTPS headers, allowing for intelligent traffic distribution.
- Content-Aware Load Balancing: Routes requests based on content type or user behavior, optimizing resource use for different types of traffic.
- Adaptive Load Balancing: Dynamically adjusts routing based on current server load and network conditions, enhancing performance.
- Machine Learning-Driven Load Balancing: Uses predictive analytics to optimize traffic distribution, improving over time as it learns traffic patterns.
- Scaling database with Leader – Follower technique: Now we have more users who will perform read only operations while only few artists who will do read and write. We can implement a Leader database which will perform both read and write. Leader database will have multiple follower databases which will be dedicated for read only operations.
- Data Sharding and Replication with Leader – Leader technique: Segmenting the database into smaller, manageable parts (shards) to improve performance and ensure data availability.
- Enhanced CDN Strategies: Utilizing multiple CDNs to reduce latency further and handle the increased traffic.
- Sophisticated Machine Learning Models: Implementing more complex algorithms for the recommendation engine to handle the larger dataset and provide more accurate suggestions.
Scaled Phase: Expanded Version Storage Estimation
Song Storage
- Assumption: Maintaining the average song size of 3MB.
- Calculation: For 100 million songs, the required storage expands to 3MB×100,000,000=300,000GB or 300TB
Song Metadata Storage
- Assumption: The metadata size remains at about 100 bytes per song.
- Calculation: For 100 million songs, 100 bytes×100,000,000=10GB
User Metadata Storage
- Assumption: Keeping the average at 1KB of data per user.
- Calculation: For 500 million users, 1KB×500,000,000=500GB
Putting it all together – Scaled Phase